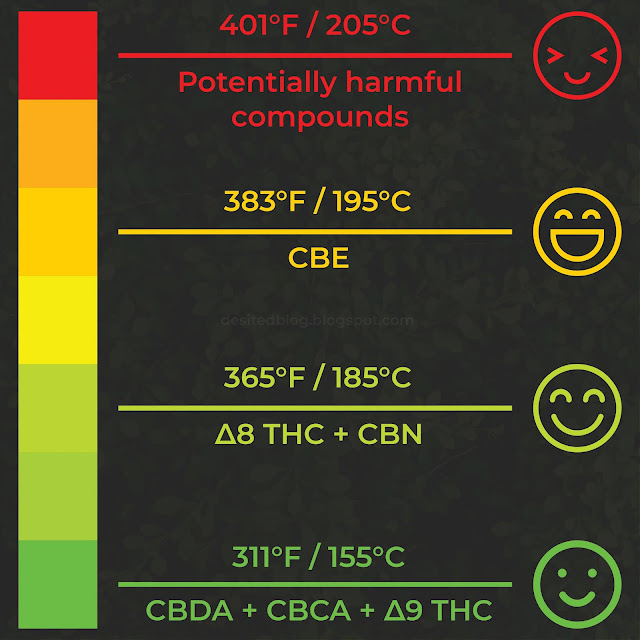
There are a number of reasons why I became a TED convert after years and years of combusting my herbs. Apart from the obvious reasons such as convenience and stealth, what really arrests my attention is the fact you can control the effects you experience simply by adjusting the temperature.
What is the point of Temperature Control?
Dry herbs contain a wide range of compounds that are activated at different temperature ranges. Depending on the strain, combustion occurs close to 500°F and lighters provide temperatures exceeding 600°F. At such a high temperature, many of the compounds within the plant get altered or destroyed, which means you miss out on the effects that you get at lower temperatures.
Thermal extraction devices solve this problem by allowing you to experiment with different temperatures to get the effects that you personally enjoy the most. The temperature affects not just the buzz, but the taste too.
Lower temperatures starting from around 300°F provide better flavours with mellow buzz while higher temperatures around 400°F provide slightly less enjoyable flavours but with a heavier high. I don’t want to get too technical; you can read this guide for detailed information about the compounds released at different temperature ranges.
Lower temperatures are also generally easier on the throat, with higher temperatures leading to coughing.
The sweet spot for me is in the range of 360°F to 390°F as I find that it has the best balance of flavours and effects. At temperatures below 400°F, you can also avoid potential carcinogens, thus providing a method of harm reduction that is impossible with combustion.
How to Control the Temperature
Temperature control is easiest with TEDs that have precise temperature controls, such as the XMAX Vital which was my starter TED. You can read my post 'TED Tips for Desi Newbies' to know what to look out for while buying your first TED.
While you can definitely play with the temperatures on TEDs that have fixed temperature settings, as well as analog ones such as the Dynavap (M 2021 review), a TED with precise temperature controls will make it extremely easy to understand your own preferences with regards to flavours and effects.
Temperature Control with TEDs that have precise settings
For TEDs with precise control settings, you can try out a different temperature in each session. Start out by testing out the temperature ranges. For example, 360°F in Session A, 365°F in Session B, 370°F in Session C, gradually going up to 390°F.
Once you have an idea of which temperature range is more to your liking and suitable for your flowers, start making tiny increments of 1°F to 2°F. You will be surprised to feel how much of a difference even a small change in the temperature can make.
After a while, you can take it to the next level by increasing the temperature slowly while the session is on. For example, start out at 370°F and work your way up to 385°F till you have extracted enough. This is called 'temp stepping'.
Temperature Control with TEDs that have fixed settings
If you have a TED that only has fixed settings, it’s just a matter of trying out every setting as there are usually only 3 to 5 temperatures available. You can check the TED’s manual to know the exact temperature associated with each setting.
Temperature Control with the Dynavap
Things get a little interesting with the TEDs such as the Dynavap that have no temperature settings at all as the heat source is external. This means that there is no way of knowing the exact temperature that it is operating at. However, this doesn’t mean that extracting at your desired temperature is impossible with a Dynavap. There are heating techniques you can use to make the cap click at different temperatures.
According to this article on the official Dynavap Blog, heating the cap at the top causes it to click at a lower temperature (300°F to 340°F) while heating the base of the cap will cause it to click at a higher temperature (400°F to 450°F). Keeping this in mind, you can experiment with heating the cap at a different position each session to get a fair idea of the effects that each position on the cap corresponds to.
You can even try out the Low Temp Captive Cap which, according to Dynavap themselves, clicks at 15°F lower than the standard cap, thus widening the temperature range available for experimentation. The Low Temp Captive Cap also has the additional benefits of making it easier to: a) avoid the release of potentially harmful chemicals and b) prevent combustion.
Remember, the point of varying the temperature is all about figuring out what works best for you. Spend some time experimenting with your device and different strains for learning the skills necessary to take complete control over your experience. Once you get the hang of it, you will find that an entirely new way of getting the most out of your flowers has opened up.
Did you find the guide helpful? Got questions or something to add? Leave a comment (System of a) Down 👇 or DM me on Reddit
Purchases made through links on the page may be eligible for an affiliate commission. Affiliate partners strictly do not have any editorial inputs.


Comments
Post a Comment